 Get Started [3]
 Sending Documents
 Signing Documents
 Document Management [2]
 Account Overview [3]
> Support > User Guide
Sign Up (Log In)
1. You need to login an SignX account in order to use our services to send the PDF documents for signatures. If you have not got an account yet, please open your preferred Internet browser and go to https://signx.wondershare.com/ , click the yellow "Free Trial" button in the top menu, please enter the requested information to create a free account.

2. Then you will get an Account Activation email, please go to your email box and click the "Verify your email" button to activate it.

3. Then It will move to the login interface. Just insert your password and click on Login button to log in this account to start using.

Buy
The free account is limited to send 5 documents and maximum size for each document is 5MB, so it is better to purchase the SignX service to use the Premium account, which has no quantity limitation to send documents and you can enjoy with better security protection, customized branding and smart fields.
In order to buy the SignX service, please sign up a free account first. After login the free account, you can click the red "Buy Now" button at the top-right corner of the web page, you will get to the purchasing page: https://signx.wondershare.com/buy-new.html. And you can choose to pay annually or monthly, the below price for each month will change automatically when you choose annually and monthly. You can also choose to buy multi-user in one account now, the sub-accounts can be distributed to your colleagues or co-workers.

After paying successfully, you will get the confirmation email send to your email address. You can log out your account and log in again, the free account will change to the Premium account.
System Requirements
Most modern computers will work just fine with SignX. But just to be thorough, this topic provides the minimum system requirements needed to enjoy the SignX experience.
1Supported Browsers
SignX supports the latest stable release of the following browsers:

2Screen Resolution
1024 X 768 minimum (for desktops and laptops)
3Security
- All per session cookies.
- Users accessing the internet behind a Proxy Server must enable HTTP 1.1 settings via proxy connection.
- Get strongest commercial SSL encryption protocols to keep your documents safe on a state-of-the-art SSAE-16 and ISO 27001 certified data center with a robust disaster recovery plan.
Sending Documents
Sending documents out and collecting signatures are what SignX services all about. This is used for situations where you need to sign a document, or you may need signatures from multiple people on one document.
Getting multiple signatures on a single document is one of the main workflows in SignX services. It gives you the opportunity to gather signatures in a specific order.
-
Login your account, click the blue "Start For Signing" button.

-
If you have purchased a multi-user account, after login your account, please click the "User" tab to invite other users as the sub-account by clicking the "Add" button. After the other users accept the invitation, they can login their sub-account to start sending documents for signature, it will be the same as the following steps. In this primary account, you can click the users' names to check the stutas of the documents that are sent out through the sub-accounts.

-
Click the "Upload document" button to browse the PDF document to upload. After uploading, you can view the PDF document to make sure it is the correct file that you want to send.

-
After uploading, it will display the first page of the PDF document. And if you want to add an access code, you can enter it at the bottom of the page. In this way, when the recipients try to open the document to sign, he needs to enter the access code. And this function is only available in the Premium account.

-
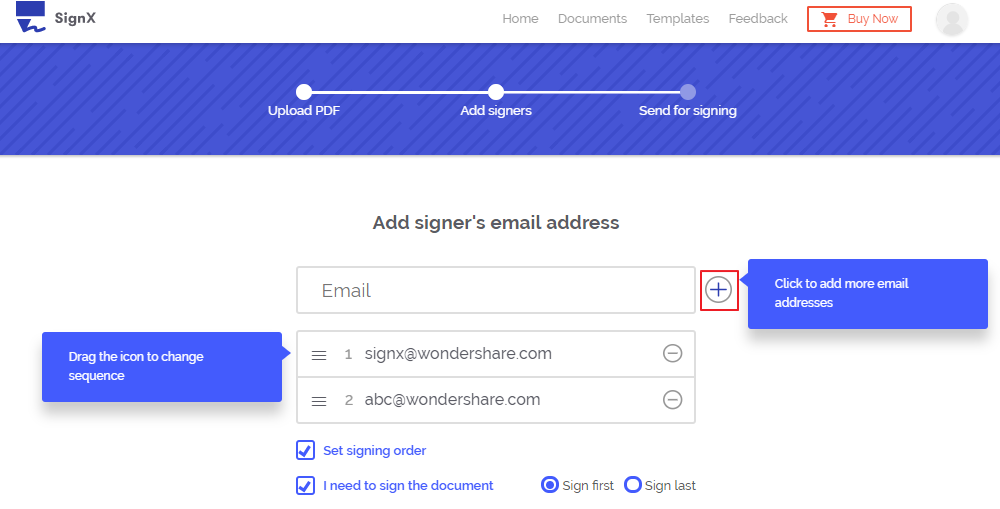
Click the "Next" button to enter the email addresses of the signers' in the box. Click the "+" icon to add more email addresses in the list. By default, the signers will sign the document in the order they are entered here. You can rearrange them by dragging on the black icon on the left side of the recipient's email. If yourself also need to sign this document, please choose the option of "I need to sign the document", and select to "Sign first" before all the recipients or "Sign last" after all the recipients. Click "NEXT".

-
Customize your email message, which will be sent to all the recipients one by one automatically. If you are in the Premium account, you can click the image icon to upload your own logo, it will display in recipients' emails. Click the "Next" button to continue.

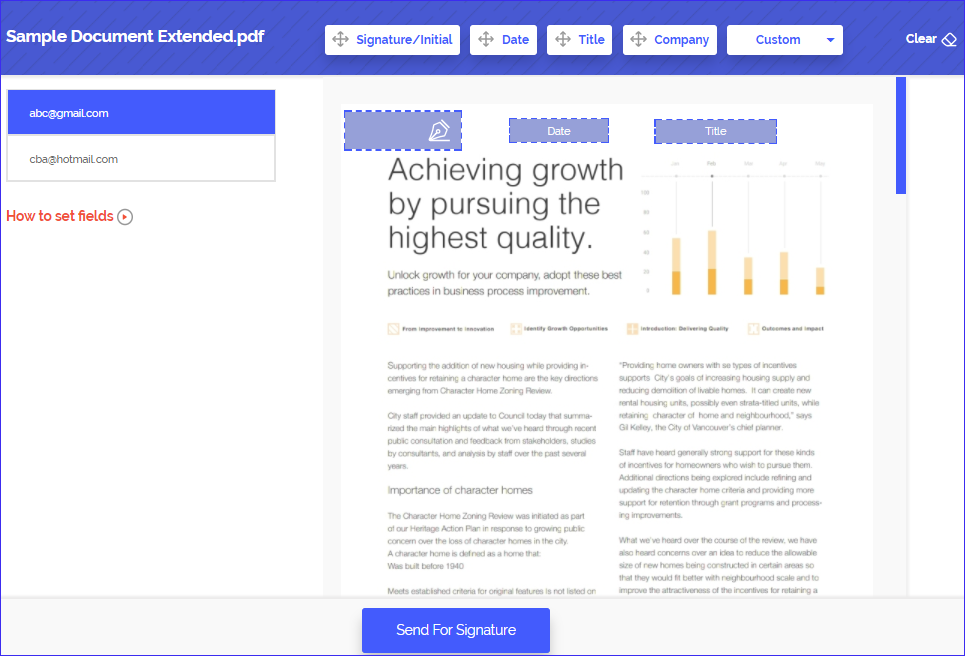
- Set fields for sender and all recipients. The recipient in blue means it has already been selected on left side list, so you just need to add the fields on the document as you need for this recipient to fill. After placing the fields for this recipient, click the next recipient on the left side list and add all the fields for the next recipient.
-
Place the required fields "Signature/Initial", "Date", "Title", "Company" and "Custom" that are associated with the selected recipient by dragging them from the field tabs and dropping them on the document. If you have placed the field in a wrong position, just drag the field to move it to the correct place where you want. You can click the "x" icon on the top-right corner of the field to delete it. Or click the "Clear" button on the top-right corner of the web page to delete all the added fields at once. You can also put the mouse click at the three corners of the fields to resize it. (Click the "How to set fields" button to watch the demo video about how to add the signature feidls.)

- If you are the first one who needs to sign this document, check the "Terms of use Electronic Records and Signature Disclosure" and choose the option of "I agree to use Electronic Records and Signature Disclosure", then click the "Continue" button. Then click the field for you,then there are three ways for you to create signatures: "Type", "Upload" and "Draw". Select either way to create the new signature, then choose it from the drop down list of the Signature field tab. Drag and drop this new created signature in the position where you want in the document.
-
- Type: Start to type your signature using the key board, it will create the art signature automatically. And you can clilck the color option to change.
- Upload: Click the "Select Your Signature" button to browse and select an image on from your computer, move the dotted box to choose a specific part as the signature. Click the "Create" button to create.
- Draw: User your mouse or touchpad to draw your signature here. Select a color first, then draw the signature, the default color is grey.


- After adding all the required fields for all the recipients, please click the blue "Send For Signature" button, the previous customized email message will be sent to the first recipient directly. If you choose to sign first, then when you set the fields you have already added your created signature in it, so the email message will be sent to the next recipient after you.

Signing Documents
1. Signing is one of the main functions of SignX services. Anyone can sign via an email link on any web browser on their computer or using their mobile device. If you are a recipient, you will receive the following signature request email in your email box.


2. Please click the "Sign The Document" button in your email, it will be opened by the default browser on your computer directly. Choose the option of "I agree to use Electronic Records and Signature Disclosure" and click the "Continue" button. Only the fields that need you to fill will be enabled in blue, other fields will be greyed out. So click the fields that need you to fill in to add your signature or other information. You will also have the same three methods to create your signature. After filling all the required fields, please click the "Submit Signature" button to send the signed PDF document. The email will go to the next recipient directly.

3. After all the recipients signing and submitting the document, they will receive an email to confirm that all the recipients have signed, you can click the "View The Document" button in your email to view the signed PDF document in your browser directly. You can also click the "Detail" button on the web page to view more details, then click the "Download" button or the "Print" button as you want.

4. If you are a recipient and also have an SignX account, you can login your SignX account, click the "Waiting for Me" box to find this document to sign in your account to sign directly.

Document List
"My Document" page of your account lists all of your documents you have ever uploaded or sent. You can easily review document status, access your files and perform additional actions, like sending a document. Once you send a document, or just start a draft, it is added to your list of documents. You can also click the "Trash" button to delete the document from your list. And in the "My Document" page, you can know the basic status for your documents. From this list, you can see the following details:
- Draft: the document has not been sent because it has not been added the form fields. This will occur when you navigate another page from the adding signature fields page.
- Prepared: the document has already been set the signature and other required fields for the recipients, and needs to be sent out directly.
- Sent: the document has been sent out for signatures, and the sender does not need to sign or the sender needs to sign at last.
- Viewed: the document has just been viewed by one recipient and has not been done any other operation.
- Signed: the document has already been signed and submitted by some recipients, but haven not completed the whole process yet.
- Completed: the document has already been signed by all the required recipients can be found with this status.

Document Status Details
In the document list, you can click the document name to view it, and get more specifics information about the document status/people/details. The information displays each recipient's activity on the document, including the date viewed, which recipients have signed, and which have yet to complete the signing. After sending out a PDF file for signatures, you can download the file in any status now, no need to wait to download until all the recipients have signed.

Home
This section helps you get familiar with your SignX account settings and functionality. The Home page is your gateway to your SignX services account. It provides access to some of the key functionality in SignX services and displays information of importance.

- Waiting for Me: lists the documents number that are waiting for your signature, click it to check the documents list.
- Waiting for Others: lists the documents that you sent out and are waiting for others' signatures, click it to check the document list.
- Completed: lists the documents that you sent out and have completed the process, click it to view the documents list.
- Start For Signing: this is the quick access to start sending a document for signatures.
- My SignX ID: once you create your signature, it will appear here in the Home page, and you can add this signature in PDF documents to sign directly.
- Free Account: allows you to send 5 documents for signatures and it will countdown automatically.
- Premium Account: has no documents quantity and size limitation to send, it is better security protected, enables custom branding and has smart fields. You can click the "Upgrade" button or the "Buy" button at the top page to upgrade to the Premium account.
My Document
All of your uploaded documents will be listed here under the various categories depending on the current status. You can click the blue "Add" button at the up-right corner to upload new documents to send. Click the document name to view it and check the "Status" , "People" and "Details" information. Click the button in the "Actions" column to continue the process to send out the document. And you can also press the "Trash can" button at the end of each document to remove it from the list.

Account Management
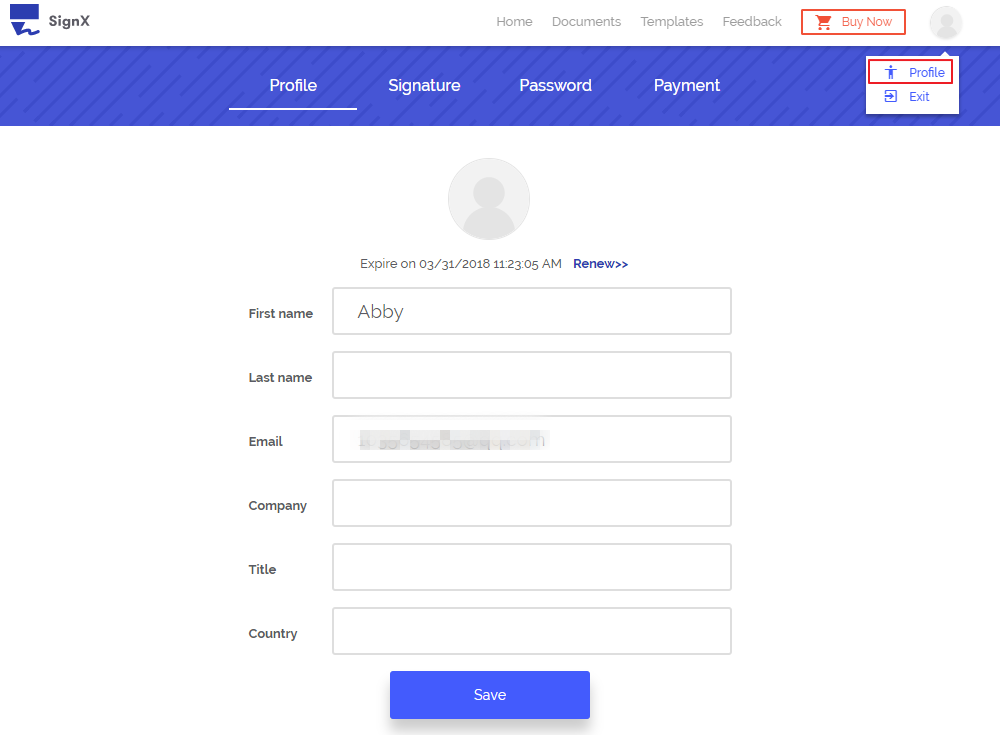
This covers the processes used to set up and maintain the information associated with your user profile. Click the image of your account to get Profile option:

- Profile: Here you can set your detailed personal information, including name, email, company, title and country. Click the image to change your account image as you want.
- Signature: Your initially created signature will be saved here, you can click the Eraser button to erase it and click the "New Signature" button to create a new one.
- Password: If you are having trouble accessing your SignX services account, you can go to the login page and request a password reset. Or in the Password tab to change the password as you want.
- Payment: You can check your order details here, including the order number, order date, expenses and content.
