We are living in a world in which paper is becoming more obsolete with every passing day. More and more businesses around the world are moving from a paper world, into a paperless world. Signing documents digitally has increased the speed and quality of the workflow. You can digital sign a vendor contract, mortgage, invoice, or anything in between. No matter the size or the industry of your business, transforming into paperless office will save you time and money. And that is all that is important.
Part 1 Why You Need to Digitally Sign Documents
1) Reduce Cost and Save Space
The direct saving is that you no longer need paper sheets to sign and print documents. The cost of paper, ink, and printer maintenance is much higher than the cost of paying an annual subscription to any software that provides digital signatures.
In addition to saving money, you will also save space. All of the documents that you sign and send are stored safely into the dashboard of your software. You can also use a cloud service to store your digitally signed documents as well. All of those paper boxes are history.
2) Save Time and Close Business Faster
When you need to sign paper document, the process goes like this: print the document, sign the document, scan the signed document, and then send the document.
When you digital sign documents, the process is much simpler and faster. You just open the document you need to sign, and add signature. You can do it from anywhere. No matter if you are in the office or not, you can digitally sign the document from your smartphone, tablet computer, or any desktop computer.
3) Improve Customer Experience
We live in a world where customers are doing more business online. They expect businesses to adjust to it, and provide online services. According to CTIA trade group, the number of mobile phones in the United States rose to 327 million in 2011. And they are 315 million people living in the US, which means there are more mobile phones than citizens. Another study from 2015 shows that two thirds of emails are opened on a smartphone. That means we are more accustomed to using our smartphone than ever. With such numbers, customers expect companies to provide online services for basically everything.
4) Track Progress
The best feature of digitally signing documents is you can track the process. Once you send the document for signing, you can track the process, and see whether someone has opened the email, viewed the document, or not. The need for asking "has he signed yet" is effectively eliminated.
5) Improve Document Security
When you sign documents in the paper world, you store them in a locked file cabinet. And then that file cabinet in a locked room. Now, while that is great security, it is a liability because someone can break in and tamper with documents. With digital signing software, you vastly improve the security of your documents thanks to encryption.
Part 2 How to Digitally Sign a Document
The first way is to use online services to digitally sign documents. One such service is DocuSign. Here is a breakdown of the process of signing documents with DocuSign.
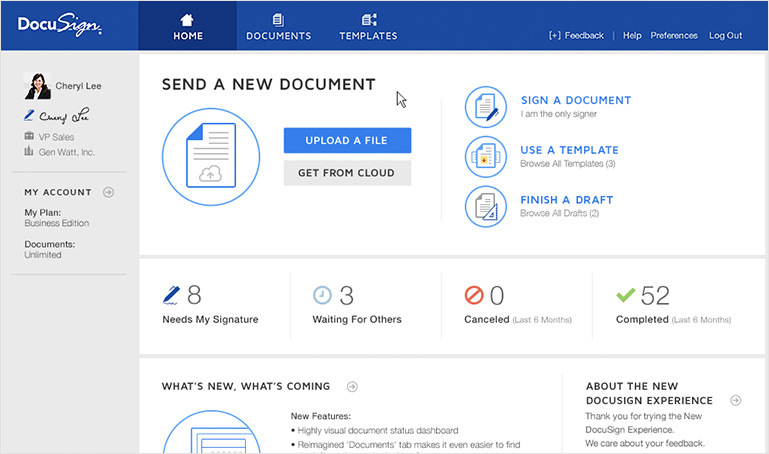
Step 1: Start the Signing Process and Verify Your Name
Once you've received a file for signing, click on the Start tag located on the left. You will be taken to the tag that requires signing the document. Click on "Sign Tag".
Before signing the document, you will be asked to verity that your name and initials are correct. If not, you can change them.
Step 2: Adopt a Signature
You can do one of three following actions at this point: accept the default signature and initial style and move to the next step, change the style, or click on draw to draw your signature and initials using a mouse or touchpad.
Step 3: Save your Signature and Confirm Signing
Click on the button "Adopt and Sign" to adopt your signature information. You will return to the original document.
Once you finish all signature tags in the document, you can confirm the signing process by clicking on "Finish".
The second way to digitally sign documents is by using desktop software. PDFelement 6 is such document. You can create a digital signature that can serve the same purpose as a handwritten signature to authenticate the identity of a user. Here is a how to create digital signature.
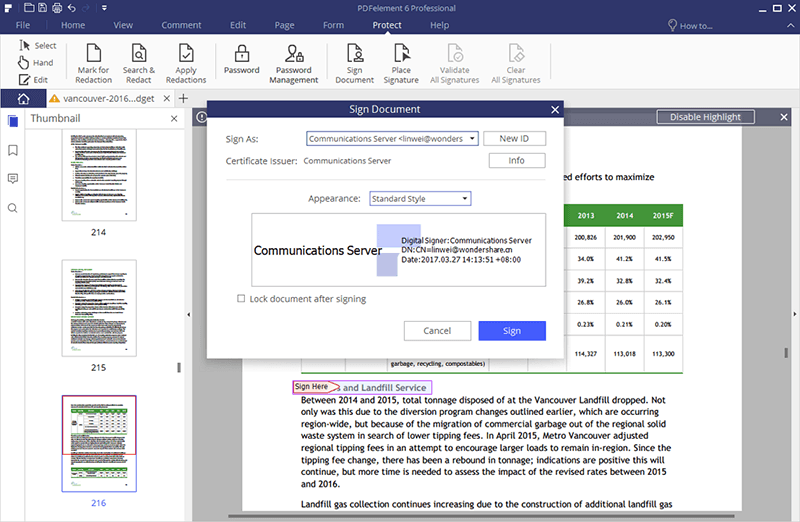
Step 1: Add Signature
Open a PDF document that has a signature field. Click on "Protect" and then on "Sign Document". If you have an ID already created, you can choose the one you want. If not, continue as per instructions to create a new ID.
Step 2: Create Digital ID
Digital ID is the identity of a person or organization that contains name, email, serial number, name of the company, and an expiration date. There are two keys, a public and a private. The first one is for encrypting or locking data, while the private is for decrypting and unlocking data. You can obtain a digital ID from a third-party provider called Certificate Authority. To get a new ID from PDFelement, click on "New ID" button, and follow the instructions to create one.
- New PKCS#12 Digital ID File – This one will store the digital ID information to a file with *.pfx extension on Windows and *.p12 on Mac OS. You can use this digital ID across different operating system.
- Windows Certificate Store – This one will store the digital ID to a common location and other windows applications can also retrieve it.
Step 3: Place Signature
Usually, PDF documents contain a signature field. However, if there is no signature field, go to "Protect" > "Place Signature" and click the button to add a signature field. You can change the appearance of your signature by clicking "Appearance" and then "Create new Style".