Creating an electronic signature on mac is as easy as creating electronic signature elsewhere. How to do an electronic signature on mac? It depends on what tool you are using. There are so many options to add electronic signature on mac but not every option is perfect. Some are very complex to use while others are downright costly. It is hard to find a perfect balance of ease, features, and price when it comes to the electronic signature on mac. This tutorial is designed to teach how to create an electronic signature on mac in the best way possible.
Part 1Online Platform You Need for Creating Electronic Signature on Mac

A very intuitive tool from Wondershare SignX is a full package that gives you ease of use, security options, and affordable price. It can create an electronic signature and send an important PDF document to the parties involved safely. You have options to create your signature of choice. You can add more security at every layer.
It has everything that will update you with the current location and status of your document, hence, it is the most secure electronic signature software out there. It is completely browser based but they don't force you to install any plugins. Affixing electronic signature on documents is too easy with SignX. It is the best option to create an electronic signature on mac.
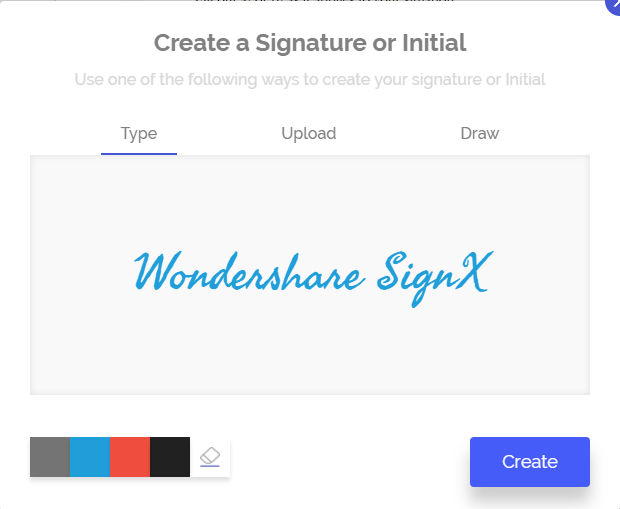
- You can "Draw, Type or Upload" an image of your signature
- Upload PDF file from computer or your favorite file sharing service
- You can assign signature positions for all parties including yourself
- You can decide to sign first or last
- Audit trails to track the signer's intent
- You can password protect and encrypt your file
- Seamless editing tools for editing your PDF file
- Centralized dashboard to show all account activities at one place
- Users can be added or removed in your account with easy steps.
Part 2How to Create an Electronic Signature on Mac
Step 1: Create Electronic Signature in 3 Ways
You can create an electronic signature in more than one ways using SignX. To create a signature, click the "Create a Signature" link under your name and email on your account's homepage.
Once you click it, you will see a popup that will let you "Draw" your signature. You can also erase the mistakes if needed. If you prefer a typed signature, click on "Type" tab that is next to the "Draw" tab. Here you can type your signature. If you have an image or a scanned copy of your signature and you want to upload it, click "Upload" tab next to "Type tab and then click on "Click to upload" to browse your signature file. After that click "Create".
Step 2: Upload PDF File on Mac
On your account's homepage, click on "Send New Document". You will see a small popup with text "Click to upload (+)". Click on it to start browsing for your PDF file on your computer. Alternatively, you can also upload your PDF file from your favorite file sharing service like Dropbox or Google Drive etc.
Step 3: Add Recipients and Add Signature to PDF on Mac
After the upload is complete, you can add access code and click "Next". Here you can add emails of the recipients using the (+) sign on the text field provided to enter email details. Select if you want to "Sign First" or "Sign Last". Click "Next". You will reach a window where you can add a message for the recipients. If you have any specific instructions for them, you can inform them securely via this message. After adding a message, click "Next".
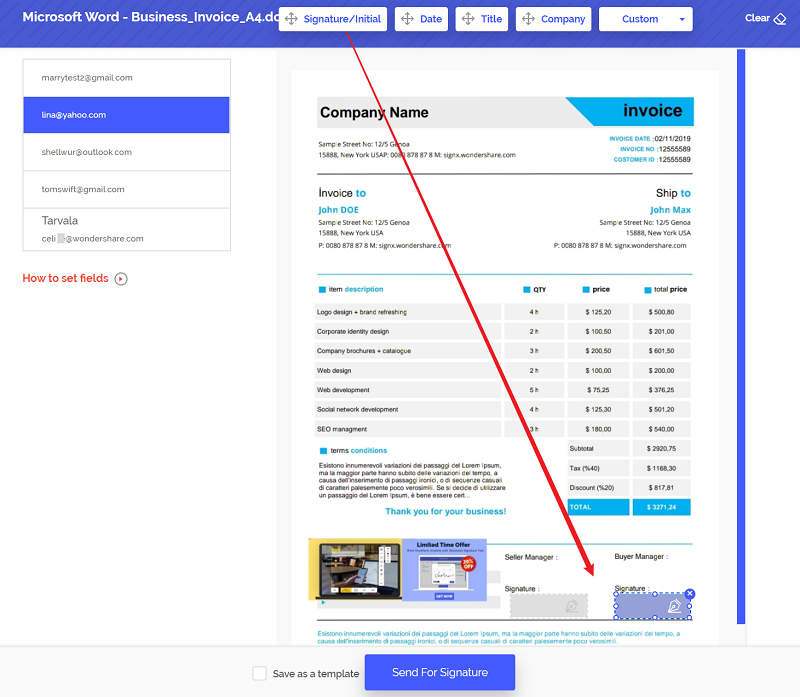
The window you reach now will have names of all participants on the left and the document in the center. Click on each name to assign a signature position. If you want to add your signature, simply drag and drop it on your signature location!
Step 4: Collect Signatures from Others on Mac
After the editing, assigning signature location and adding signature is complete, click on "Send for Signature" to dispatch the document to the parties involved. They will receive it in their email. They can sign it according to your instructions and send it back.
It's easy to manage signed PDF files with SignX since they are located on the secure server where no one can reach it without proper credentials. You can access them anywhere and at any time. All you need is an internet enabled device.
Part 3How to Create an Electronic Signature on Mac
- Prefer typed or hand drawn signature over uploaded one
- Always use a professional electronic signature tool for signing
- Use your mobile to create a neatly drawn signature
- Use your e signature on Mac carefully since they are legally binding
- Always use an Mac e-sign tool with tracking facility
- Always add end-to-end security before sending your document
- Until you are a corporation, don't use e-sign tools with hefty charges for downloads or for installing updates.


